
- STEP1. What you need beforehand
- STEP2. Log in to the game panel
- STEP3. Check your connection info (IP/port)
- STEP4. Start the server
- STEP5. Complete first-time authentication (Device Login)
- STEP6. Connect to the server from the game
- STEP7. (Optional) Add and configure a query port (for external server lists / monitoring)
- STEP8. Stopping / restarting the server (basic operations)
- STEP9. FAQ / Troubleshooting
This guide walks you through getting the Hytale server you ordered from BESTNET G-Server up and running: “start → first-time authentication → connect”.
Important: On our Hytale servers, the game port / query port are assigned randomly, not fixed.
Always use the port numbers shown in the panel’s Network (allocations).
STEP1. What you need beforehand
- An account that already owns Hytale (used for first-time authentication)
- The game panel URL / login details in your order-completion email
- A web browser (PC recommended)
* Players cannot connect to the server until first-time authentication is complete.
STEP2. Log in to the game panel
- Open the game panel URL in your order-completion email
- Log in with your username / password
- From “Servers” or the server list, select your own Hytale server
STEP3. Check your connection info (IP/port)
Hytale mainly uses UDP. To connect you need the IP address + game port.
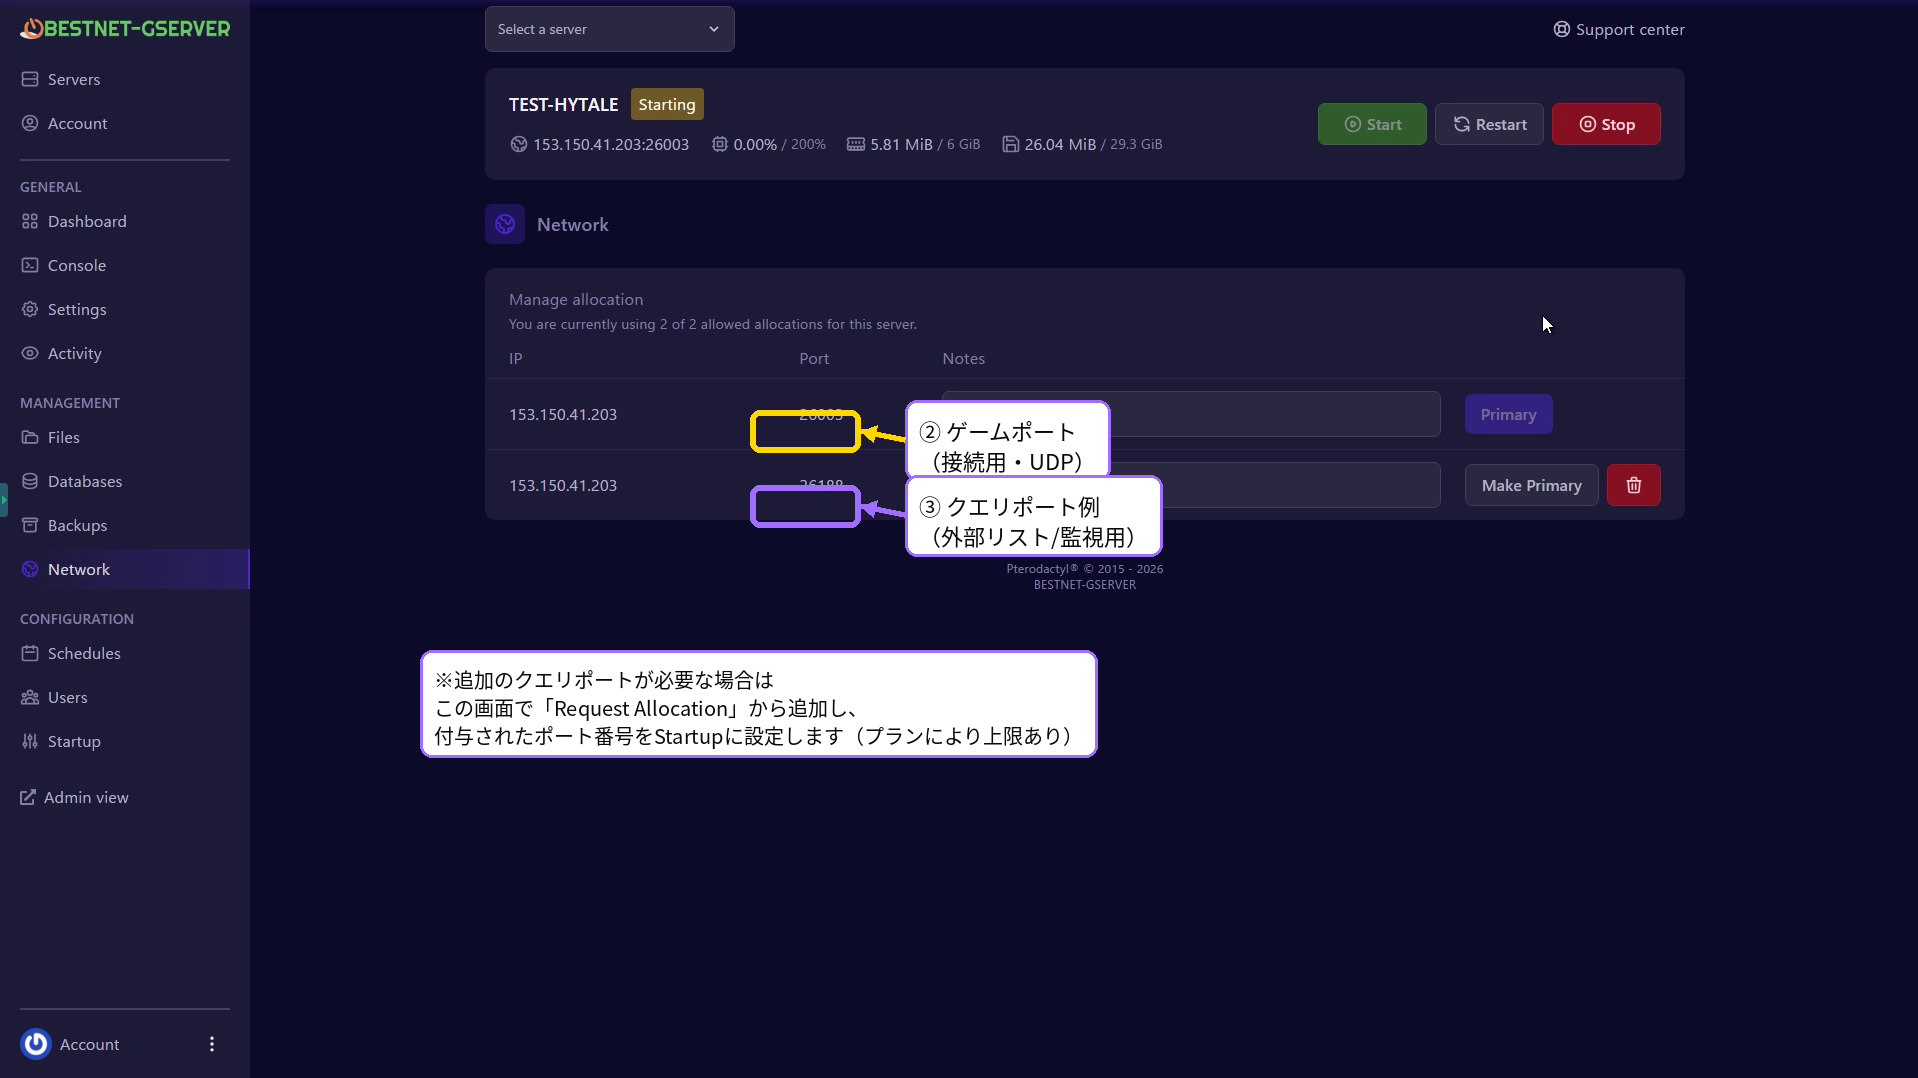
- Open Network in the left menu
- In the port list, the row marked Primary is your game port (for connecting)
- (If there is a second port) it can be used as a query port for external server lists / monitoring
Note:
- Primary (game port) is the port used to join the game
- The query port is for external server lists / monitoring and cannot be used to join the game
- The port number is not “fixed at 5520”. Always use the number shown in the panel
STEP4. Start the server
- Open Console (or Dashboard) in the left menu
- Click Start at the top-right to launch it
- Wait until the status becomes Running
* Right after the first launch, the first-time authentication prompt appears in the console.
STEP5. Complete first-time authentication (Device Login)
STEP5-1. Authenticate with the URL/code shown in the console (basic)
- Open Console in the left menu
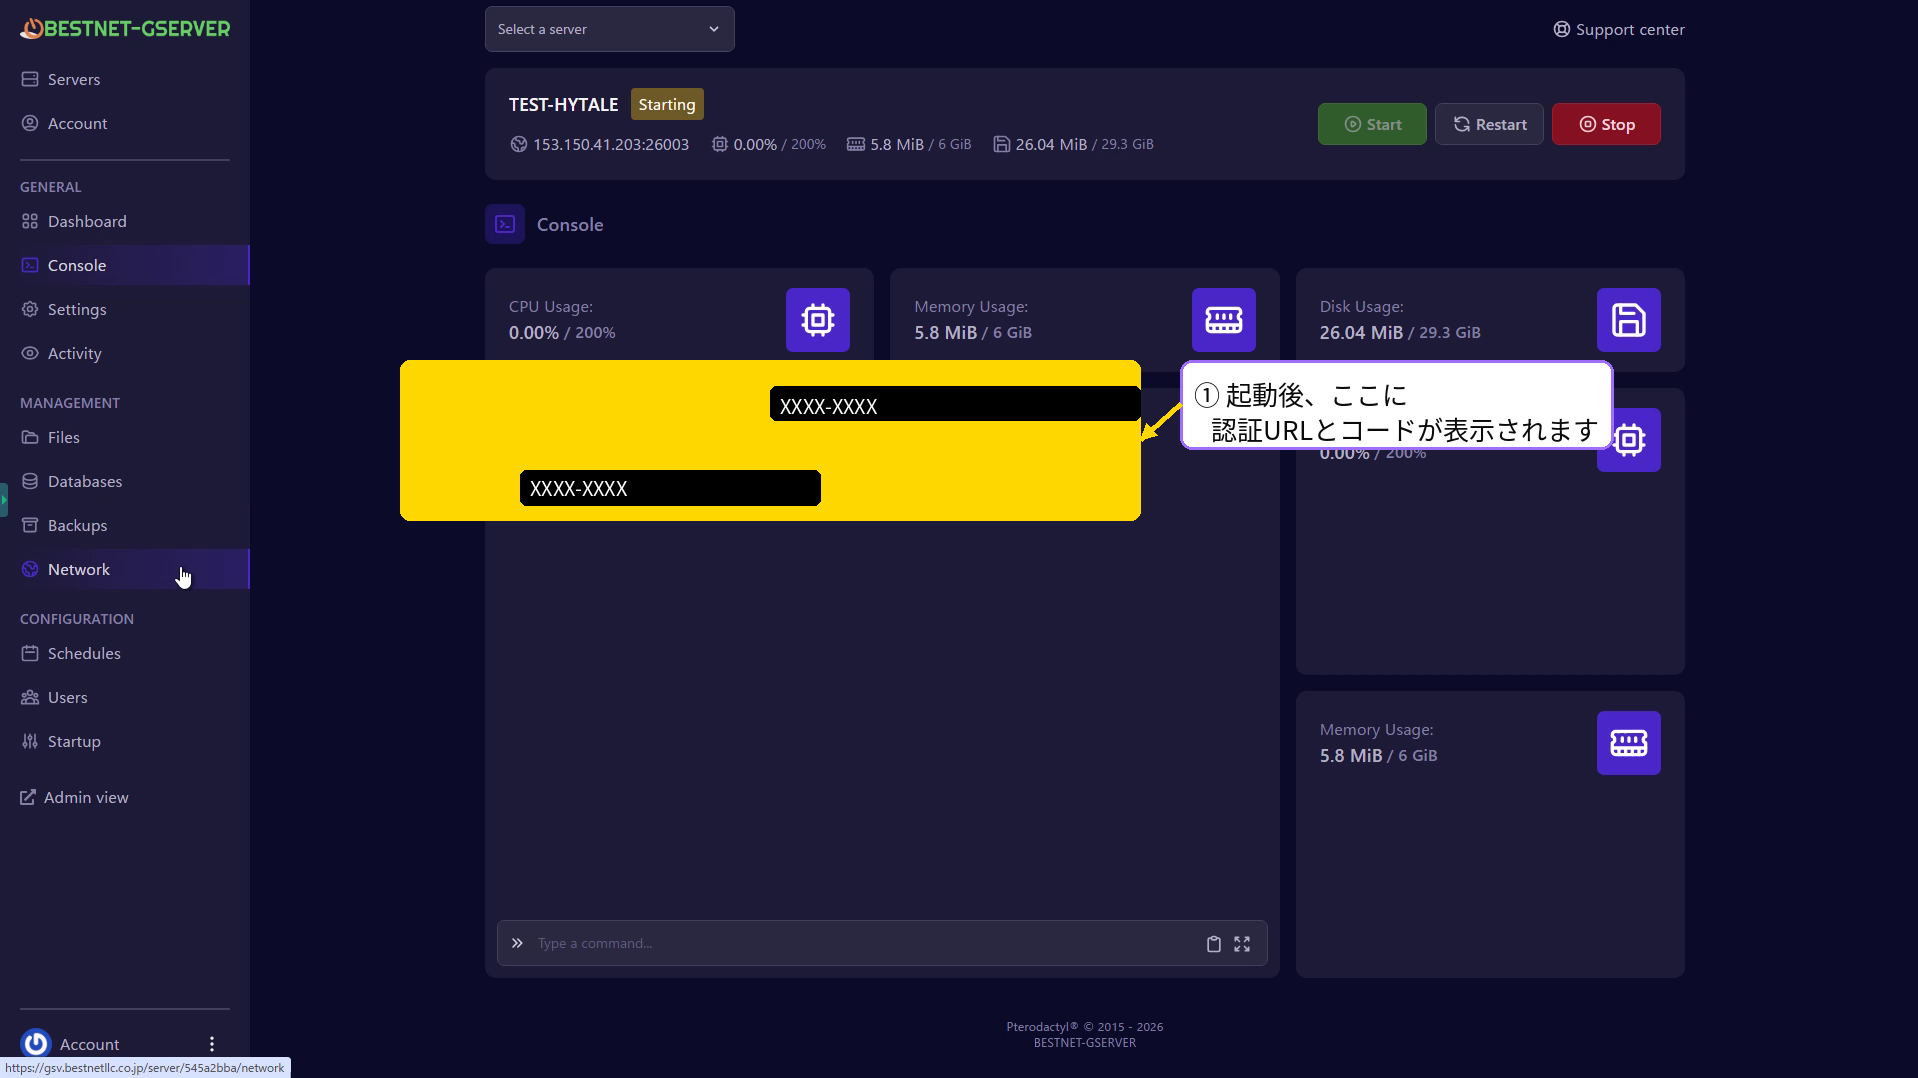
- After startup, an authentication URL and code appear in the console
- Click the URL to open it in a browser and log in with your Hytale account
- Follow the on-screen instructions, enter the code, and approve the authentication
- When the console shows authentication success, you’re done
STEP5-2. If the URL/code doesn’t appear (show it manually)
If the URL/code doesn’t show after a while, run the following in the Console input field.
/auth login deviceIf it still doesn’t appear, try the following.
- Run Restart at the top-right, then re-check the Console
- Disable your browser cache/extensions and try again (if the auth page won’t open)
STEP5-3. Notes
- The authentication code has an expiry. If it expires, run
/auth login deviceagain - Do not share the authentication URL/code with third parties
STEP6. Connect to the server from the game
- Open the “Server connection” screen in the game
- Enter the IP address and game port (Primary)
- If it connects, you’re done
Common mistakes:
- Connecting to the query port (won’t connect)
- Connecting before authentication is complete (won’t connect)
- UDP is restricted on a school/work network (try a mobile or different network)
STEP7. (Optional) Add and configure a query port (for external server lists / monitoring)
A query port is not required. Set it up only if you want to “list your server on external server lists” or “check online status with a monitoring tool”.
STEP7-1. Prepare an allocation for the query port
- Open Network in the left menu
- If you already have a second port, you can use it as the query port
- If you don’t have a second one, add a port with Request Allocation on the screen
- Note the added port number (e.g. 26010)
Note: If you’ve reached your plan’s limit, Request Allocation may not be available. In that case, please contact support.
STEP7-2. Configure the query port in Startup
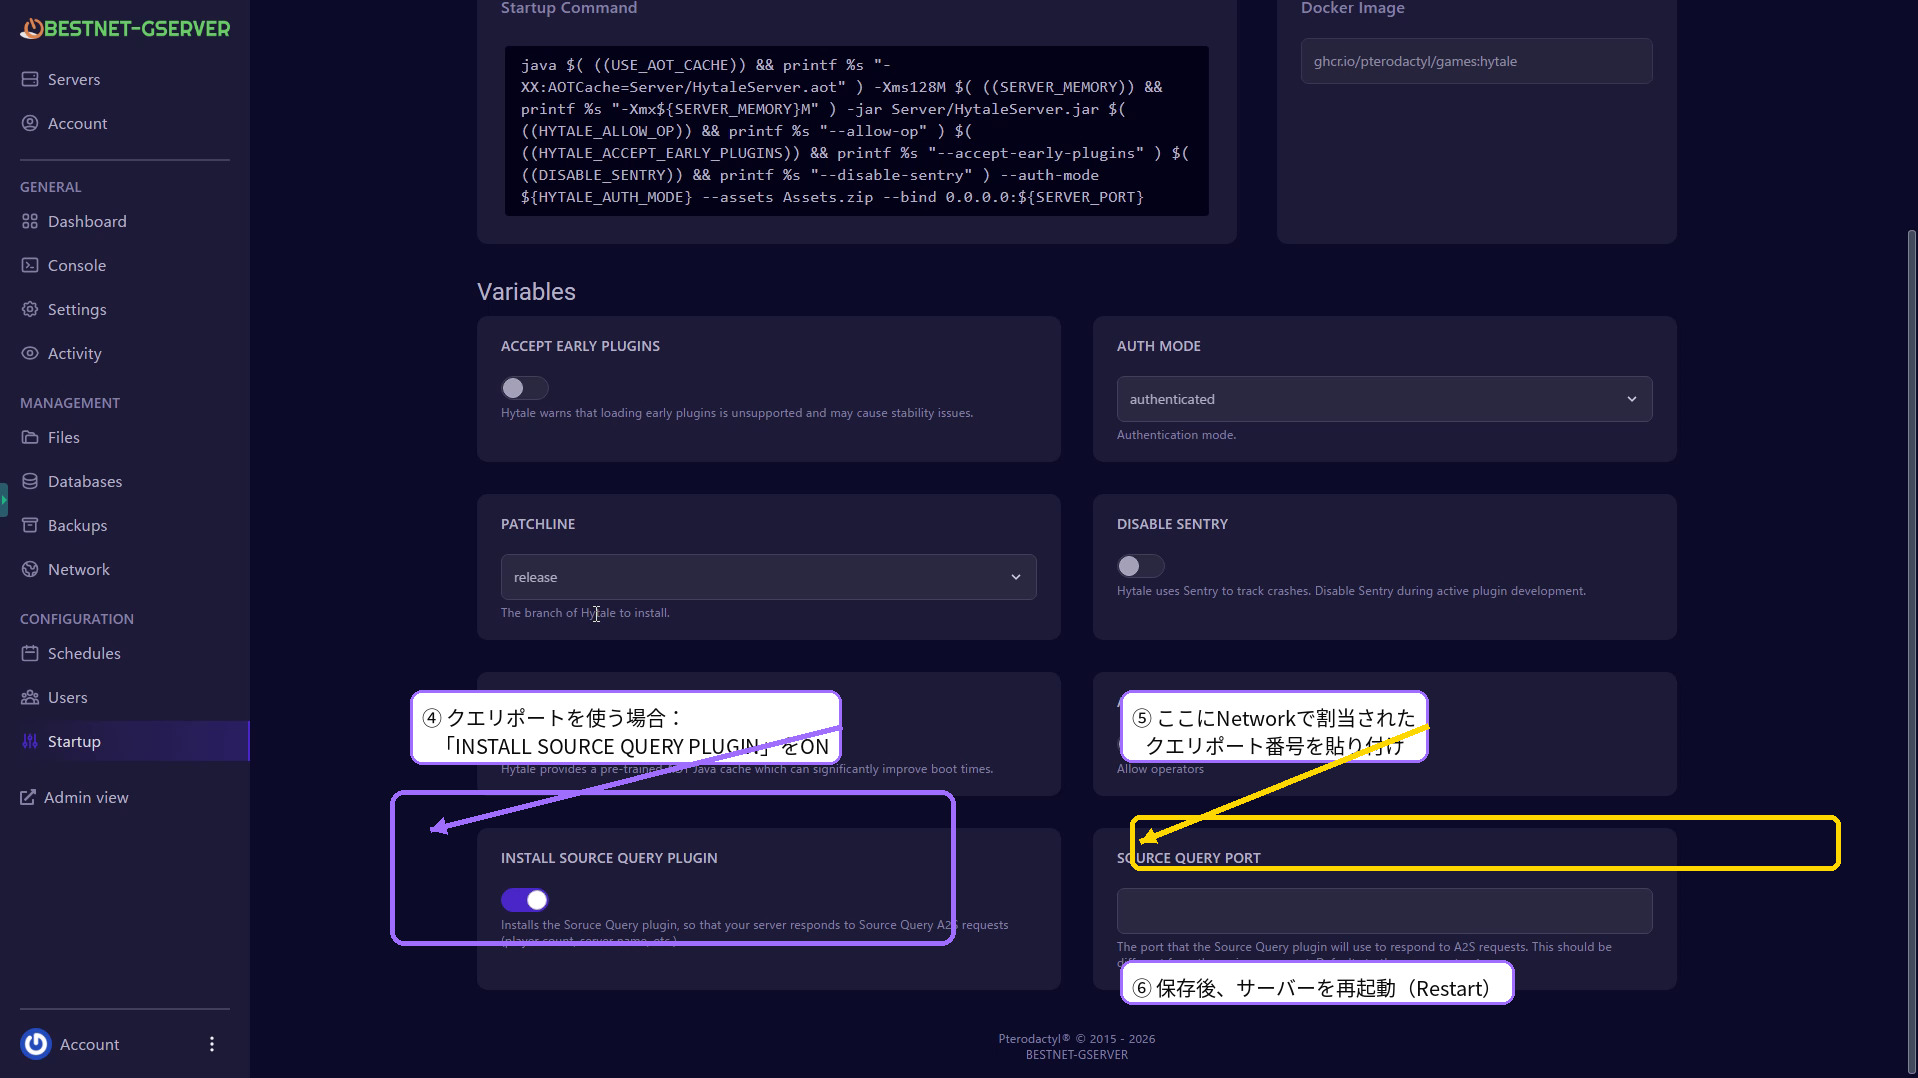
- Open Startup in the left menu
- Turn INSTALL SOURCE QUERY PLUGIN ON
- Paste the query port number allocated in Network into SOURCE QUERY PORT
- After saving, run Restart at the top-right
Key points:
- Enter only the port number, not IP:PORT
- A Restart is required after changing settings (they won’t apply without a restart)
- The query port is not “fixed at game port + 1” (use the allocated number)
STEP8. Stopping / restarting the server (basic operations)
- Stop: stops the server
- Start: starts the server
- Restart: restarts it (use this after changing settings)
Recommended: Always run Restart after changing Startup or Network settings.
STEP9. FAQ / Troubleshooting
STEP9-1. I can’t connect
- Check that first-time authentication (STEP5) is complete
- Check that you’re connecting to Primary (the game port)
- If UDP is restricted on a school/work network, try a different network
STEP9-2. The auth URL/code doesn’t appear in the Console
- First, wait a few dozen seconds (it may appear with a delay right after startup)
- Run
/auth login devicemanually - If that doesn’t help, re-check after a Restart
STEP9-3. I want to list on a site that needs a query port, but there’s no response
- Check that INSTALL SOURCE QUERY PLUGIN is ON in Startup
- Check that SOURCE QUERY PORT matches the number allocated in Network
- Check that you ran Restart after configuring


