
This guide walks you through the BESTNET-GSERVER Valheim dedicated server, from ordering to configuring and joining, so that even first-time users can follow along without getting lost.
- v1.0
- September 2026 — First edition.
- v1.1
- September 2026 — Updated for Valheim 1.0. Added how updates are applied on restart, the change to the world save format, where the join code is stored, and notes on crossplay and consoles. Added a figure to “Starting the server”.
- v1.2
- September 2026 — Added the world modifiers, the connection details shown at startup, and the join code being saved to a file.
- v1.3
- September 2026 — Rewrote the joining instructions so that they follow the crossplay setting. Added joining by entering the server address directly. Tidied up the explanations of mods and networking.
- v1.4
- September 2026 — Added the on/off settings (
-setkey) and how to revert them (-resetmodifiers). Clarified how the format differs from the in-game console. - v1.5
- September 2026 — Added a list of common mistakes. Added
muchmoreandmuchlessto the values available forresources(both confirmed on a real server). - v1.6
- October 2026 — Added instructions on how to transfer worlds from other servers or PCs, and how to verify successful loading. Supplemented the explanation of World Name.
From order to a ready-to-use server
Once your payment is completed, the server is built automatically and delivered to you already set up. We will send you an email as soon as it is ready.
During the build, we take care of the following on our side. There is nothing you need to prepare yourself.
- Downloading the game server itself and verifying that all files are complete
- Assigning the required ports
- Generating a join password dedicated to that server
Logging in to the game panel
All server operations are done from the game panel, which you use in your browser.
- Use the details in your order completion email to log in to the game panel.
- After logging in, select the Valheim server on your account.
- From the menu on the left you can move to screens such as Console, Files, Backups, Network, Schedules and Startup.
Checking the settings
Server settings are configured on the game panel's Startup screen. What you enter is saved automatically and takes effect the next time the server starts.
You can play with the default settings as they are. Only change them when you want to.
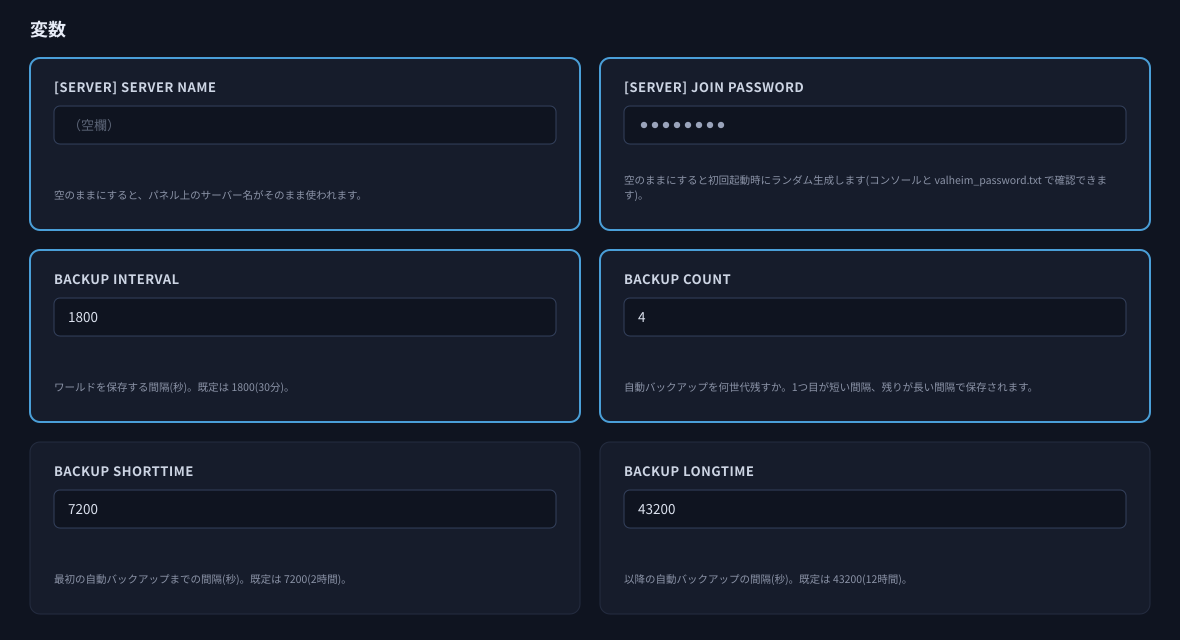
| Item | Description |
|---|---|
| [SERVER] Server Name | The name of the server. If you leave it blank, the server name shown in the game panel is used as-is. Choosing a name your friends can recognize makes the server easier to find. |
| [SERVER] Join Password | The password required to join. If you leave it blank, a password dedicated to that server is generated automatically on the first start. See "Checking the join password" for how to look it up. |
| World Name | The name of the world to load. Set it to match the folder name inside worlds_local (case-sensitive). Restart the server after making changes.When transferring a world from another server or PC, please refer to "Transferring a World from Another Server or PC". |
| Public Server | Whether the server is listed publicly in the server list. Enabled by default. |
| Auto Update | Checks for game updates on every start. Enabled by default. |
| Enable Crossplay | A switch that turns crossplay on or off. Turn it on to play with people on PlayStation 5, Nintendo Switch 2, Xbox, the Microsoft Store edition or Game Pass; leave it off if everyone plays on Steam. Restart the server after changing it. How people join depends on this setting, so please also read "Joining the server". |
| Backup Interval | How often the world is saved, in seconds. The default is 1800 (30 minutes). |
| Backup Count | How many generations of automatic backups are kept. The default is 4. |
| Backup Shorttime / Backup Longtime | The intervals for automatic backups, in seconds. The defaults are 7200 (2 hours) and 43200 (12 hours). |
| World Modifiers (Valheim 1.0) | Lets you change Valheim 1.0 world settings such as combat difficulty and the death penalty. Leave it blank to change nothing. See Changing the world modifiers below. |
Changing the world modifiers
Enter your settings in the World Modifiers (Valheim 1.0) field on the game panel's Startup screen, then restart the server to apply them.
The format is -modifier <key> <value>. To set several, separate them with spaces.
-modifier combat easy -modifier deathpenalty casual -modifier resources more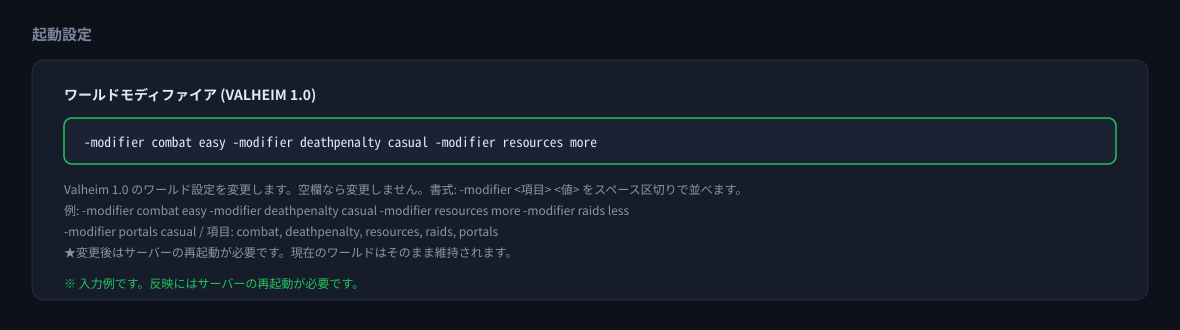
| Key | What it changes | Values we have verified |
|---|---|---|
combat | Combat difficulty | easy |
deathpenalty | Death penalty | casual |
resources | Resource amount | more / muchmore / muchless |
raids | Raid frequency | less |
portals | Portal restrictions | casual |
On/off settings (-setkey)
World modifiers come in two kinds. The -modifier settings described above choose a level (such as combat difficulty), while the -setkey settings described here turn something on or off. Both go in the same field, separated by spaces.
-modifier combat easy -setkey playerevents| Key | What happens when it is enabled |
|---|---|
playerevents | Raids are triggered by each player's progress rather than by the world's |
nobuildcost | Building no longer consumes materials |
passivemobs | Enemies no longer attack on their own |
nomap | The map is disabled |
noportals | Portals are disabled |
teleportall | Items that normally cannot go through a portal, such as ore, can be teleported |
setworldmodifier <item> <value>. The hyphenated form such as -setkey is only for this field. Typing it into the console simply prints the command usage and changes nothing.Reverting the settings
To revert them, use -resetmodifiers.
- Stop the server.
- Set the World Modifiers (Valheim 1.0) field to
-resetmodifiersand nothing else. - Start the server. The settings are now back to their defaults.
- Stop the server again.
- Clear the field. If you want different settings instead, enter them here.
- Start the server.
-resetmodifiers resets everything to the defaults: not only the -setkey switches but also the levels you set with -modifier. If there are settings you want to keep, enter them again at step 5.-resetmodifiers in the field. It would run on every start and your settings would never stick. Be sure to remove it at step 5.Common mistakes
These are the mistakes we see most often. In each case the server still starts, but that one entry has no effect. We have confirmed every one of them on our own test server.
| Example of what was entered | What happens |
|---|---|
-setworldmodifier raids rare | Nothing happens. This is the in-game console format. In this field it is ignored without any error message |
-modifier raidsless less | The item name is wrong. It should be raids |
-modifier difficulty normal | There is no item called difficulty |
-modifier easy | The item name is missing. It also swallows whatever follows it, so the next entry stops working too |
-modifier resources much | The value is wrong. much cannot be used (more and muchmore can) |
-setworldmodifier is the format used in the in-game console, and entering it in this field produces no error at all. If something you entered does not seem to apply, check for this first.Setting world modifier: combat->easy means it was applied. A line beginning Could not parse ... means that one entry had no effect.Starting the server
On the game panel's Console screen, press the Start button.
- The first start takes several minutes. This is because the world is generated from scratch.
- When the status turns Online and the connection details appear at the top of the console, the server is ready.
- From the second start onward it finishes in a few seconds, because the world already exists.
- When you change a setting, restart the server to apply it.
Failed to place all ... scroll past in the console. This is normal progress of world generation, not an error. Please just wait.If crossplay is on, restarting issues a new join code, so please pass the new code to the people you play with (see Joining the server). The server address and port do not change when you restart.
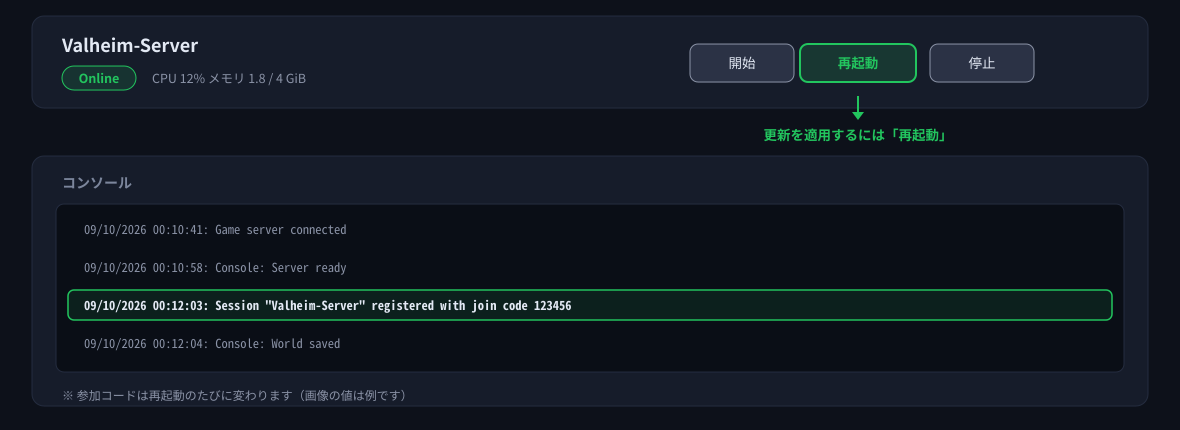
This appears once you have restarted the server.
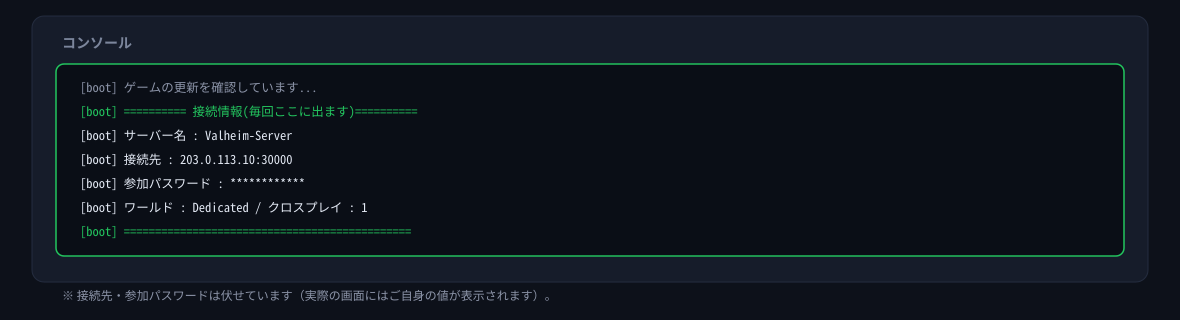
Checking the join password
If you leave [SERVER] Join Password blank, a password dedicated to that server is generated automatically on the first start. The same password is never reused across servers.
- Open the game panel's Files screen.
- Open
valheim_password.txtin the top-level directory (home). - The string written in it is the join password for that server.
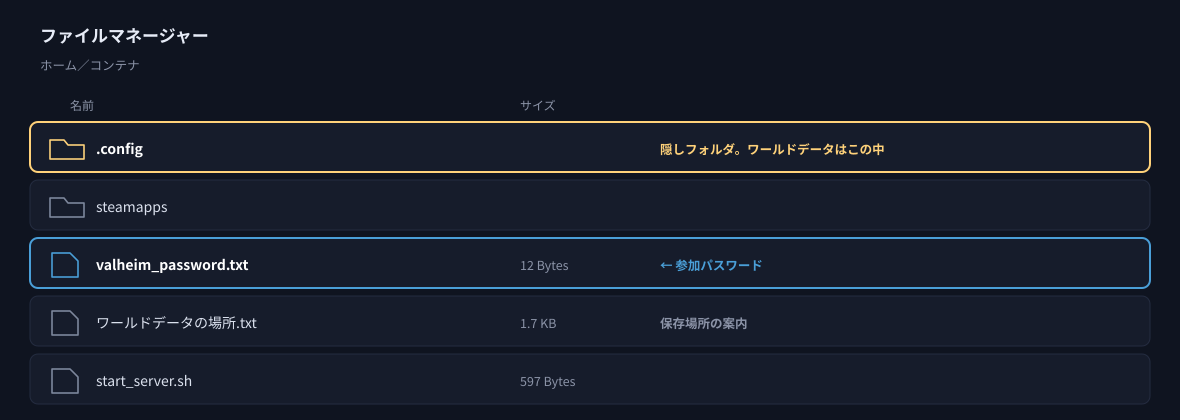
valheim_password.txt directly under homevalheim_password.txt.This appears once you have restarted the server.
Joining the server
How people join depends on the crossplay setting. Start by checking which setting your server is using.
In the connection details printed at the top of the console when the server starts, the number in
World: OO / Crossplay: 1 is the current setting (1 = on / 0 = off).You can also check and change it with the Enable Crossplay switch on the Startup screen of the game panel. Changes take effect when the server is restarted.
| Setting | Suits | How to join |
|---|---|---|
| Off (0) | Everyone plays on Steam | Enter the server address and port directly in the game (Method A) |
| On (1) | Playing together with PlayStation 5, Nintendo Switch 2, Xbox, Microsoft Store edition or Game Pass | Join with the 6-digit join code (Method B). Entering the address directly also works |
Method A: Enter the server address and port directly
This method works whether crossplay is on or off. The address does not change when the server restarts, so once you have noted it down you can use it every time.
- Open the Console screen in the game panel and look at
Address: ***.***.***.***:*****printed at the top (the same value is also shown at the top of the panel). - Start Valheim, pick your character and world, and open the Join Game screen.
- In the field for joining by IP, enter
address:portexactly as shown. - Enter the join password you looked up above, and you are in.
Method B: Enter with a join code (only when crossplay is on)
Servers with crossplay on are issued a 6-digit join code. Share the code and people can join without being told the address.
- Open the Console screen in the game panel.
- Look for a line reading
Session "server name" registered with join code ......(it appears one or two minutes after startup). - The 6 digits on that line are the join code.
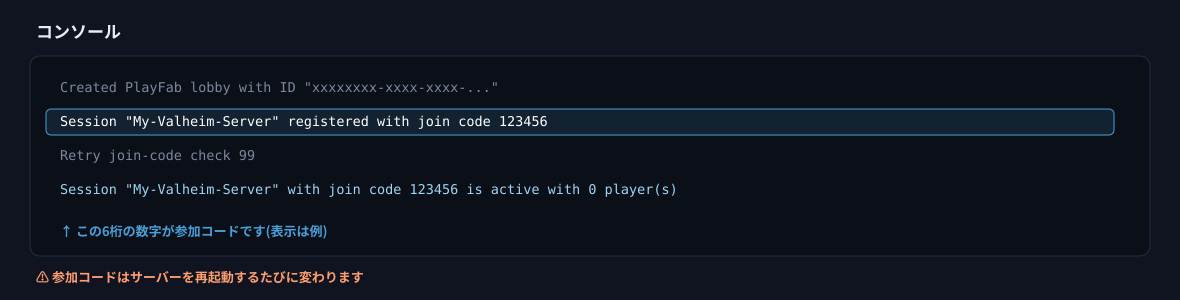
Note that if the server was started with crossplay on at some point,
valheim_joincode.txt may still hold that older code, which will not work while crossplay is off.If someone says yesterday's code no longer works, this is the first thing to check.
valheim_joincode.txt (you can read it at any time from the top of the Files screen).Note that the join code (
valheim_joincode.txt) and the join password (valheim_password.txt) are two different things.Joining across platforms
To play together with people on PlayStation 5, Nintendo Switch 2, Xbox, the Microsoft Store edition or Game Pass, turn Enable Crossplay on on the Startup screen of the game panel and restart the server. Once it is on, a 6-digit join code is issued, and sharing it lets people join from any of those platforms (Method B).
If everyone plays on Steam, leaving it off is perfectly fine. With crossplay off, connections do not pass through a relay server, so latency may be lower.
PlayStation 5, Nintendo Switch 2 and Xbox
On these platforms you cannot host a dedicated server (you can still join one).
If you want your world to keep running while nobody has the game open, use a dedicated server.
About mods
Mods (BepInEx) cannot be used on our Valheim servers.
In Valheim, crossplay and the mod loading mechanism cannot both be active — that is how the game itself works. We prioritise a setup in which any server can be switched over to crossplay, so we do not offer a configuration for mods.
We cannot guarantee that mods you install yourself will work. Most mods stop working at Valheim 1.0, so if the server will not start, remove your mods and BepInEx and try again.
Backups
There are two backup mechanisms. Both are active by default.
| Mechanism | Description | Where to configure |
|---|---|---|
| The game's own automatic backup (the date and time in the folder name are in UTC) | Valheim itself creates backups of the world. They are kept in the same location as the world data, named <world name>_backup_auto-date-time (world name, then the date and time). | Backup Interval / Backup Count / Backup Shorttime / Backup Longtime on the Startup screen |
| The game panel's backup | A backup of the whole server. It stores only the world data and the settings, excluding the game itself (about 2 GB). That way, keeping many generations does not eat up your storage. | The game panel's Backups screen |
Where the world data is stored
The world data is stored in the following location.
.config/unity3d/IronGate/Valheim/worlds_local/<world name>/— the world data (a folder containing several files)
ワールドデータの場所.txt ("location of the world data"), directly under the server's home directory.<world name>.db and <world name>.fwl; the world is now stored as several files inside a folder of the same name.The migration happens automatically the first time the server saves. Your previous files are kept as
<world name>_backup_<date>.db, so nothing is lost.Migrate a World from Another Server or PC
You can transfer and continue playing with a world from another server or your own PC.
What You Need
Prepare the folder (all contents) of the world you want to migrate.
- From another server … On the source server's file screen or via FTP, download the entire world name folder located inside
worlds_local. - From your own PC (Windows) … Enter
%USERPROFILE%\AppData\LocalLow\IronGate\Valheim\worlds_localin the Explorer address bar to open it, and you will find the world name folder.
_main.<number>.db2 / _main.<number>.fwl2 / _main.<number>.chunks / _main.<number>.ok, along with many .chunk files. All are required.<world name>.db and <world name>.fwl) can also be used as-is. They will automatically convert to the new format on first save (only the placement location differs from step 3).Procedure
- Stop the server in the game panel.
- As a precaution, create a backup on the "Backup" screen.
- On the "Files" screen, open
.config/unity3d/IronGate/Valheim/worlds_local/, create a folder with the same name as the world, and upload all files into it.- The folder name must be the same as the source (do not change the name).
- For the 2 files in pre-1.0 format, place them directly under
worlds_local/without creating a folder.
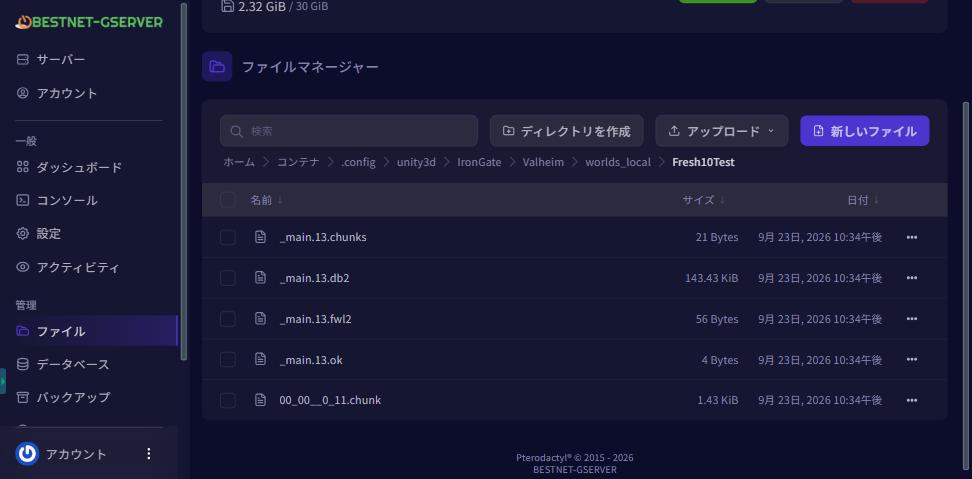
Create a folder with the same name as the world inside worlds_local and upload every save file into it - On the "Startup" screen, set World Name to the same name as that folder (match uppercase and lowercase). ★Change this before starting the server.

Set World Name to the same name as the folder you uploaded (upper and lower case too) - Start the server.
- On the "Console" screen, verify that it loaded correctly.
- Check if the
ワールド : <world name>displayed at the top matches the uploaded folder name - Check if the
ZNet.LoadWorld: <world name> (<world name>), save number <number>number matches the number in the uploaded_main.<number> - If both match, the migrated world has been loaded.

If the name after the world line matches your folder, that world has been loaded 
Check that the number after save number matches the _main.<number> you uploaded - Check if the
- Wait 1–2 minutes, then join using the newly displayed join code (or connection destination) (see "Join the Server").
Notes
- The
_main.<number>number increases by 1 with each save (e.g., 757 → 758). This is normal behavior, so do not rename files back or re-upload them. - Do not create copies of files within the save folder. This will prevent loading and cause a new world to be created with each startup.
- The
<world name>_backup_auto-<date>folder is an automatic backup created by Valheim. The date and time in the folder name is in UTC (9 hours behind Japan time). - Characters are saved on each player's PC or game console. There is no need to migrate them to the server.
- Do not delete files from the source until you have confirmed the new server works correctly.
Adding an administrator
To allow admin commands to be used in game, write the Steam IDs, one per line, in the following file.
.config/unity3d/IronGate/Valheim/adminlist.txt
In the same location there are also bannedlist.txt (the list of players who are refused) and permittedlist.txt (the list of players who are allowed).
Troubleshooting
| Symptom | What to check |
|---|---|
| The join code does not work | The join code changes every time the server restarts. Look up the latest code again on the Console screen. |
| No join code is shown | Servers with crossplay off do not issue a join code. Please join with Method A (entering the server address directly). |
| In-game ping is high, is not displayed, or players are disconnected with a network error | On servers with crossplay on, the connection passes through a relay server, so the in-game ping can read higher than it really is, or not be shown at all. If everyone plays on Steam, turn Enable Crossplay off on the Startup screen, restart the server, and rejoin with Method A. Note that with crossplay off, console players can no longer join and no join code is issued. |
| I cannot find the server | Join by entering the server address and port directly (Method A). The address does not change when the server restarts, so this always works. |
| I do not know the join password | Check valheim_password.txt, directly under home on the Files screen. |
| The first start never finishes | The first start takes several minutes because the world is generated. Failed to place all ... is normal progress. |
| I cannot find the world files | .config is a hidden folder. Turn on "show hidden files" in the file manager. |
| I want to install mods | Because of how the game works, mods cannot be used on our servers whatever the setting (see "About mods"). |
| I changed a setting but nothing happened | Settings on the Startup screen take effect when the server restarts. |
| A version mismatch stops me joining | The game has been updated. Restart the server. Note that the join code changes after a restart. |
| A new world without buildings is displayed instead of the transferred world | ① Check if the ワールド : <world name> displayed at the beginning of the "Console" screen matches the uploaded folder name. If it's different, correct the World Name on the "Startup" screen and restart (changing it while running will not change the currently active world).② Check if the number after save number matches the uploaded _main.<number>.③ Check if there are any extra files such as copies in the save folder. If you notice it hasn't loaded properly, stop the server immediately without playing on that world. |
Next steps
- Logging in to the game panel and feature overview — how to use the panel as a whole
- How to set up a recurring schedule on your game server — automatic restarts and automatic backups
- Restoring from a backup
- How to add an administrator to your server
- Valheim Dedicated Server — plans and pricing


