
This guide walks you through your BESTNET-GSERVER Soulmask dedicated server, from ordering to configuring it and joining, so that even a first-time user never gets stuck.
- v2.0
- August 2026 — Fully revised for the new server setup. Adding a port allocation and typing in the query port by hand are no longer necessary (both are configured automatically). Added the automatic admin password, how to join, and how to tune the save intervals.
- v1.0
- August 2024 — First edition
From ordering to a server you can play on
Once your payment goes through, the server is built automatically and handed over already set up. We email you as soon as it is ready.
During the build we take care of the following for you. There is nothing you need to prepare.
- Downloading the game server and verifying that the files are complete
- Assigning the three ports the server needs (game / query / maintenance)
- Generating an admin password unique to your server
Logging in to the game panel
Everything to do with your server is done in the game panel, which runs in your browser.
- Using the details in your order confirmation email, log in to the game panel.
- After logging in, select your Soulmask server.
- The menu on the left takes you to Console, Files, Backups, Network, Schedules, Startup and the other screens.
The settings to fill in first
Server settings live on the Startup screen of the game panel. What you type is saved automatically and takes effect the next time the server starts.
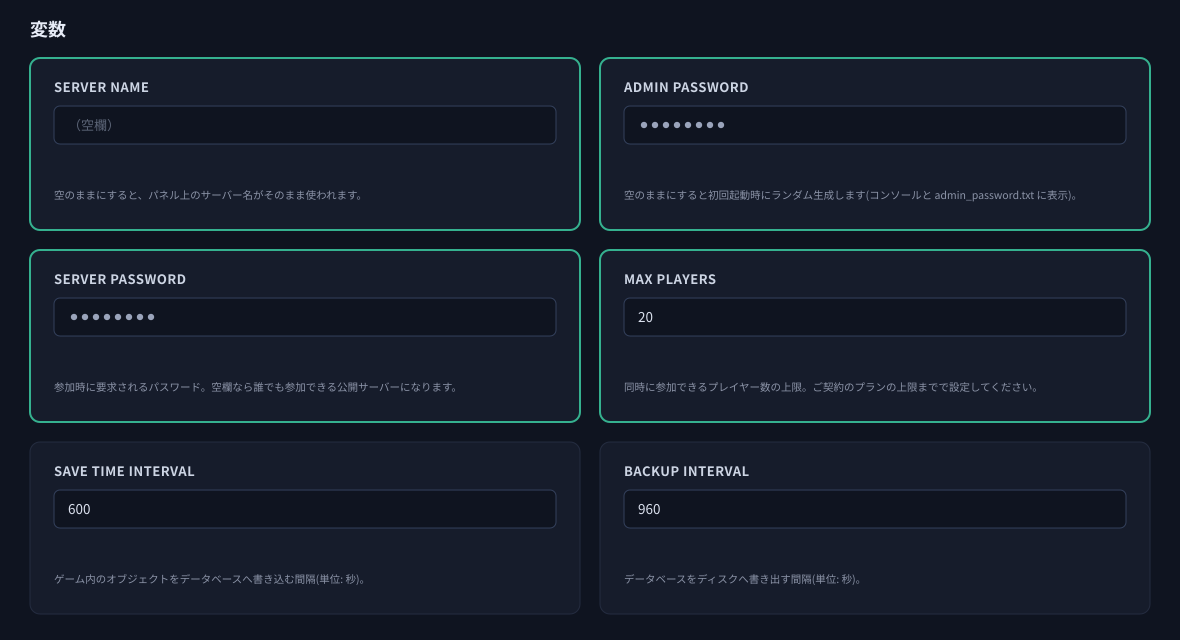
| Setting | What it does |
|---|---|
| Server Name | The name shown in the in-game server browser. If you leave it empty, the server name from the game panel is used as-is. A name your friends can spot easily makes the server quicker to find in the list. |
| Admin Password | The administrator password. If you leave it empty, a password unique to your server is generated automatically on the first boot. See "Finding the admin password" for how to look it up. You can also type in a password of your own. To change it later, edit the same field and restart the server. |
| Server Password | The password players are asked for when joining. If you leave it empty, the server is public and anyone can join. Set a password here if you only want to play with friends. |
| Max Players | The maximum number of players who can be connected at once. The default is 20. Keep it within the limit of your plan. If you need a higher limit, move to a higher plan. |
| Save Time Interval | How often in-game objects are written to the database (in seconds). |
| Backup Interval | How often the database is written out to disk (in seconds). |
| Auto Update | Checks for a game update every time the server starts and picks it up automatically if one has been released. Enabled by default. |
The ports are already set up
A Soulmask server uses a few ports besides the game port itself. They are all assigned automatically when your server is built. You can see them on the Network screen of the game panel.
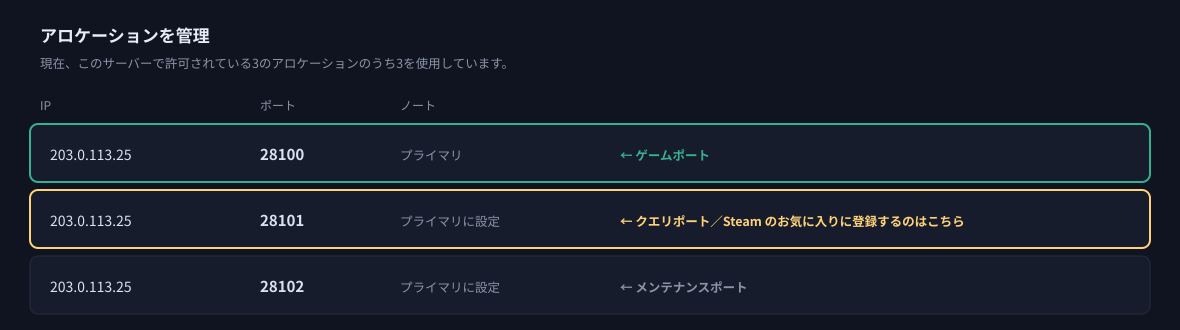
| Position | Role | Number |
|---|---|---|
| 1st (primary) | Game port | — |
| 2nd | Query port (this is the one you add to Steam favourites) | game port +1 |
| 3rd | Maintenance port | game port +2 |
Starting the server
When you are done with the settings, press Start on the Console screen of the game panel.
- The first boot downloads the game data and generates the world, so it takes a while to finish.
- Once the status turns to Online, the server itself is running.
- It is then registered in the in-game server browser. It can take a few minutes to appear in the list.
- Whenever you change a setting, restart the server to apply it.
Joining the server
Option 1: find it in the in-game server browser (recommended)
This is the simplest way in.
- Launch Soulmask.
- Open the server list (server browser).
- Type your server name into the search box.
- Select your server and join. If you set a Server Password, you enter it here.
Option 2: add it to your Steam favourites
If searching every time gets tedious, you can save the server in the Steam server list.
- Open the Steam client and choose View → Game Servers from the menu.
- Open the Favorites tab and click Add a Server.
- Enter the second port (the query port) shown on the Network screen of the game panel, in the form
IP address:port.
Example: if the game port is
203.0.113.25:28100, the address to add in Steam is 203.0.113.25:28101.Finding the admin password
If you leave Admin Password empty, a password unique to your server is generated automatically on the first boot. The same password is never reused across servers.
You can read the generated password from the Files screen of the game panel.
- Open the Files screen in the game panel.
- Open
admin_password.txtin the top-level (home) directory. - The string inside is your server’s admin password.
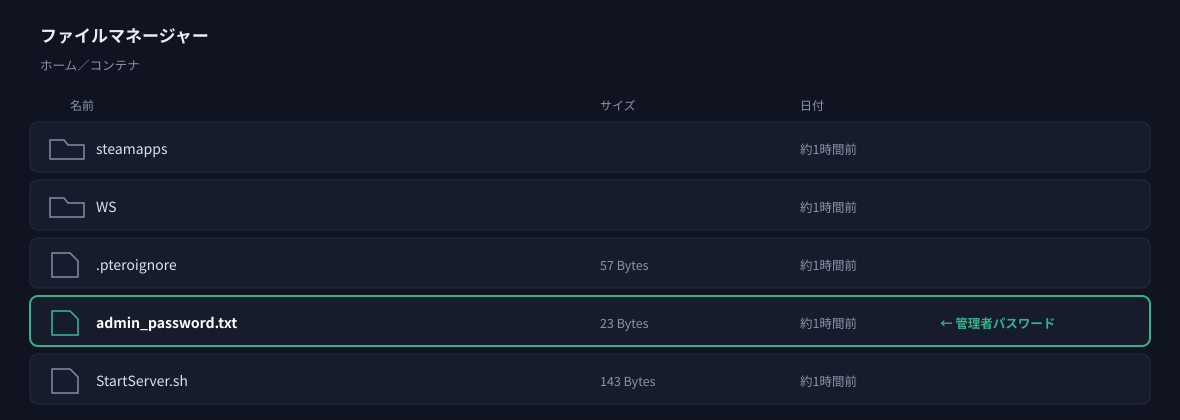
admin_password.txt in the home directoryIf the server feels heavy
A Soulmask server persists your world in two stages. You can change both intervals on the Startup screen of the game panel. Both are text fields in seconds — not dropdowns.
| Setting | What it controls | Default |
|---|---|---|
| Save Time Interval | How often in-game objects are written to the database | 600 seconds (10 min) |
| Backup Interval | How often the database is written out to disk | 960 seconds (16 min) |
- If the game stutters each time it saves — a longer interval means saving runs less often. The trade-off is that an unexpected stop rolls back more.
- If you want more frequent save points — use a shorter interval. Saving then runs more often.
Backups and restoring
You can take a backup at any time from the Backups screen of the game panel. How many generations you can keep depends on your plan.
- A backup contains your world data and settings (everything under
WS/Saved). The game binaries are not included. - The world itself is stored under
WS/Saved/Worlds/Dedicated/. - With the Schedules screen you can also take backups automatically at a set time.
Troubleshooting
| Symptom | What to check |
|---|---|
| The server does not appear in the list | It can take a few minutes after booting for a server to appear. The server re-registers every two minutes, so wait a moment and search by your server name again. Also check that the status in the game panel is Online. |
| Steam will not accept the server address | Check that you are using the query port (the second entry on the Network screen). The game port (the first entry) cannot be added. |
| I do not know the admin password | Look at admin_password.txt in the home directory on the Files screen. |
| There are red errors in the console | They come from the game engine as it loads assets and appear on a healthy boot too. If the status is Online and you can join from the in-game list, there is nothing wrong. |
| I changed a setting and nothing happened | Settings on the Startup screen are applied when the server restarts. Please restart it. |
| I want to raise the player limit | Max Players can go up to the limit of your plan. To raise the limit itself, move to a higher plan. Your server data is kept and billing is handled with a prorated payment. |
Next steps
- log in to the game panel — how the panel works
- a daily automatic restart — automatic restarts and backups
- Restoring from a backup
- Soulmask dedicated servers — plans and pricing


