
A step-by-step guide to your BESTNET-GSERVER Arma 3 dedicated server, from ordering to playing with friends and logging in as an administrator, written so that first-time users can follow it without getting lost.
- v2.0
- November 2026 — Fully revised for the rebuilt server configuration (checking the connection address, admin login, Startup tab items, mods and backups now match the new configuration).
- v1.0
- First edition.
About this guide
This guide covers everything from the moment your order is complete until you are playing with friends and can log in as an administrator. Everything is done from the game panel.
STEP1 Wait for the installation to finish
Once payment is complete, the server is set up automatically. Because the game (about 5GB) is installed, the first build took about 7 minutes in our tests. When the installation finishes, the server starts automatically.
During the build, the files are checked and anything missing is downloaded again automatically. If the files still cannot be completed, the build is treated as failed, so you never receive a server left half-installed.
STEP2 Check that the server has started and where to connect
Open the Console in the game panel. Every time the server starts, lines beginning with [bestnet] are shown as follows (these console messages are in Japanese).
[bestnet] 管理者パスワード(ゲーム内のチャットで #login に続けて入力): <admin password>
[bestnet]   (パネルの起動タブの Admin Password に入力すると、次の起動からその値になります)
[bestnet] 接続先(ダイレクト接続): <IP>:<port>- The first line is the admin password. Type it after
#loginin the in-game chat. - The second line says that if you enter a value in Admin Password on the Startup tab, that value is used from the next start.
- The third line is the address for Direct Connect (IP and port).
The game then starts. When the following line appears, the server is ready (in our tests, about 20 to 25 seconds after starting). You can connect from this point.
Host identity created.STEP3 Join from the game
The usual steps are as follows.
- Start Arma 3 and select MULTIPLAYER.
- Select DIRECT CONNECT at the bottom of the server browser.
- Enter the IP and port from the Direct Connect address line in STEP2.
- If you have set a join password, enter it as well.
STEP4 Log in as administrator
An admin password is created automatically for each server. You can check it on the console line in STEP2, or in .bestnet/admin_password under Files in the game panel.
- Join the server from the game.
- Open the chat and type
#loginfollowed by the admin password (for example#login <admin password>).
[SERVER] Admin Password on the Startup tab and restart. That value is used from the next start, and it is not shown in the console. While a value is set on the Startup tab, .bestnet/admin_password still holds the previously created automatic value (it is not the current password).For details, see How to Log In as Administrator on Your ARMA3 Server.
Startup tab items
You can change the server settings under Startup in the game panel. After changing a value, restart the server from the Console.
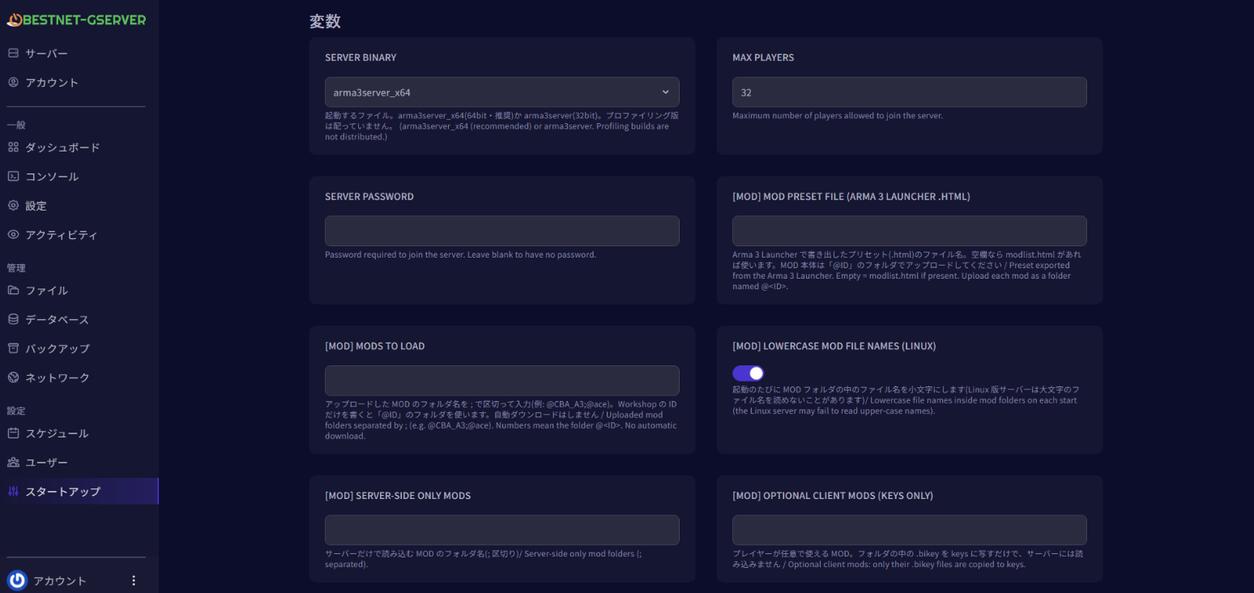
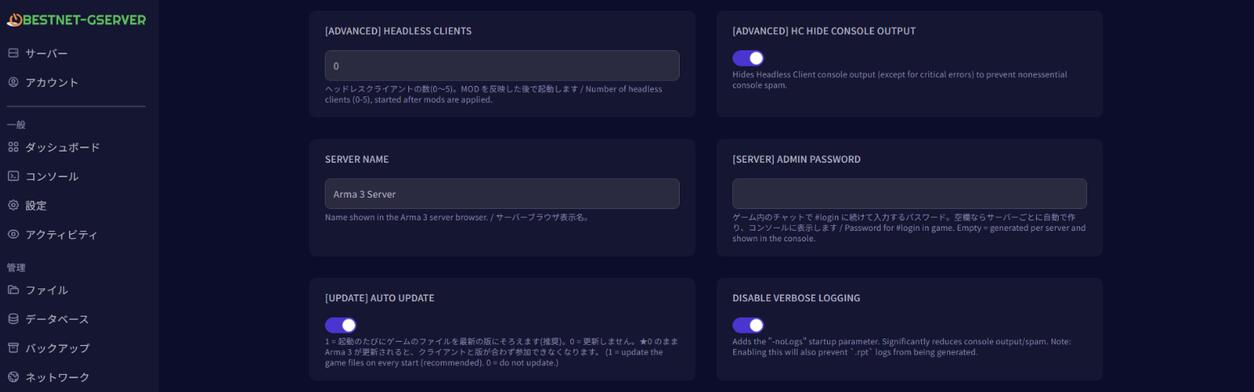
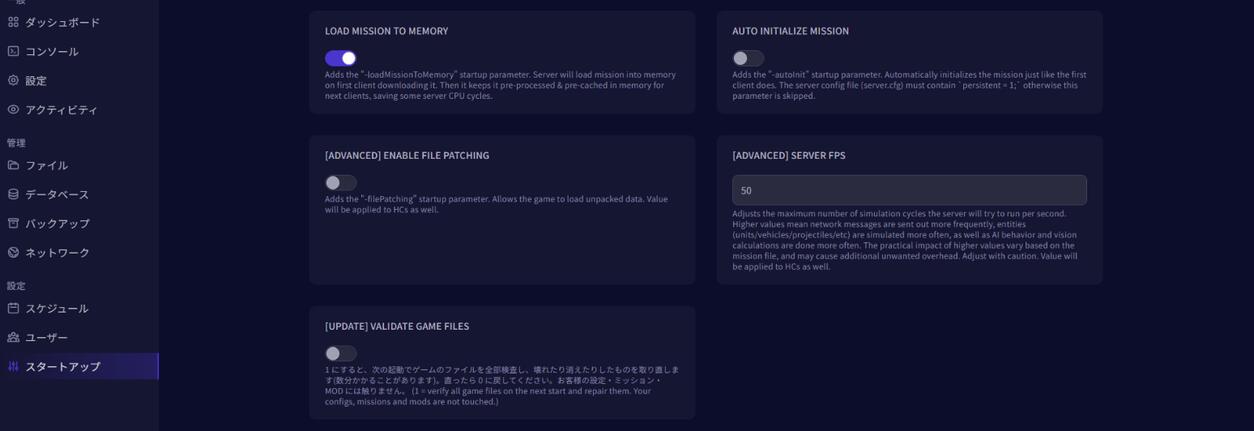
| Item | Description | Default |
|---|---|---|
Server Binary | The file that is started. You can choose arma3server_x64 (64-bit, recommended) or arma3server (32-bit). | arma3server_x64 |
Max Players | The maximum number of players at the same time. It is not set by your plan. | 32 |
Server Password | The password needed to join. If it is empty, there is no password (anyone can join). | Empty = none |
[MOD] Mod Preset File (Arma 3 Launcher .html) | The file name of a mod preset (.html) exported from the Arma 3 Launcher. If it is empty, modlist.html is used when that file exists. | Empty |
[MOD] Mods to Load | The folder names of the mods to load, separated by ; (see the mods article). | Empty |
[MOD] Lowercase Mod File Names (Linux) | Every time the server starts, the file names inside the mod folders are changed to lowercase. | On |
[MOD] Server-side Only Mods | The folder names of mods that only the server loads. | Empty |
[MOD] Optional Client Mods (keys only) | Mods that players may use if they wish. Only the keys (.bikey) in each folder are put into keys; the server does not load these mods. | Empty |
[ADVANCED] Headless Clients | The number of headless clients (0 to 5). They start automatically 45 seconds after the server starts and stop together with the server. | 0 |
[Advanced] HC Hide Console Output | Output from headless clients is not shown in the console (errors are not shown either). If the headless clients do not work properly, turn this off and restart to see their output. | On |
Server Name | The name shown in the game's server list. It is not the same as the name shown in the server list of the game panel (the server's name in the panel). | ARMA3-<service number>-Bestnet-Gserver |
[SERVER] Admin Password | The password you type after #login in the in-game chat. If it is empty, a password is created automatically for each server and shown in the console. | Empty = automatic |
[UPDATE] Auto Update | Every time the server starts, the game files are brought up to the latest version (recommended). If this is off when Arma 3 is updated, the versions no longer match and players cannot join. | On |
Disable Verbose Logging | Adds -noLogs to reduce console output. While it is on, .rpt logs are not created either. | On |
Load Mission To Memory | Adds -loadMissionToMemory. The mission loaded by the first player is kept in memory, so later loads are lighter. | On |
Auto Initialize Mission | Adds -autoInit so that the mission starts without waiting for the first player to join. persistent = 1; is required in server.cfg. | Off |
[Advanced] Enable File Patching | Adds -filePatching so that unpacked data can be loaded. | Off |
[Advanced] Server FPS | The upper limit on how many times per second the server processes the game. Raising it also raises the load. | 50 |
[UPDATE] Validate Game Files | When it is on, all game files are checked at the next start, and broken or missing files are downloaded again. Turn it off again once the problem is fixed. Your settings, missions and mods are not touched. | Off |
Where the files are
Under Files in the game panel (or over SFTP), you will find the following in the top-level folder.
| Location | Contents |
|---|---|
mpmissions | The folder for mission files (.pbo) (see the missions article). |
server.cfg / basic.cfg | The server configuration files. |
keys | The folder for mod keys (.bikey). Keys inside mod folders are copied here automatically when the server starts. |
Folders starting with @ | Mods you have uploaded. |
.bestnet | Holds a copy of the automatically created admin password (admin_password). |
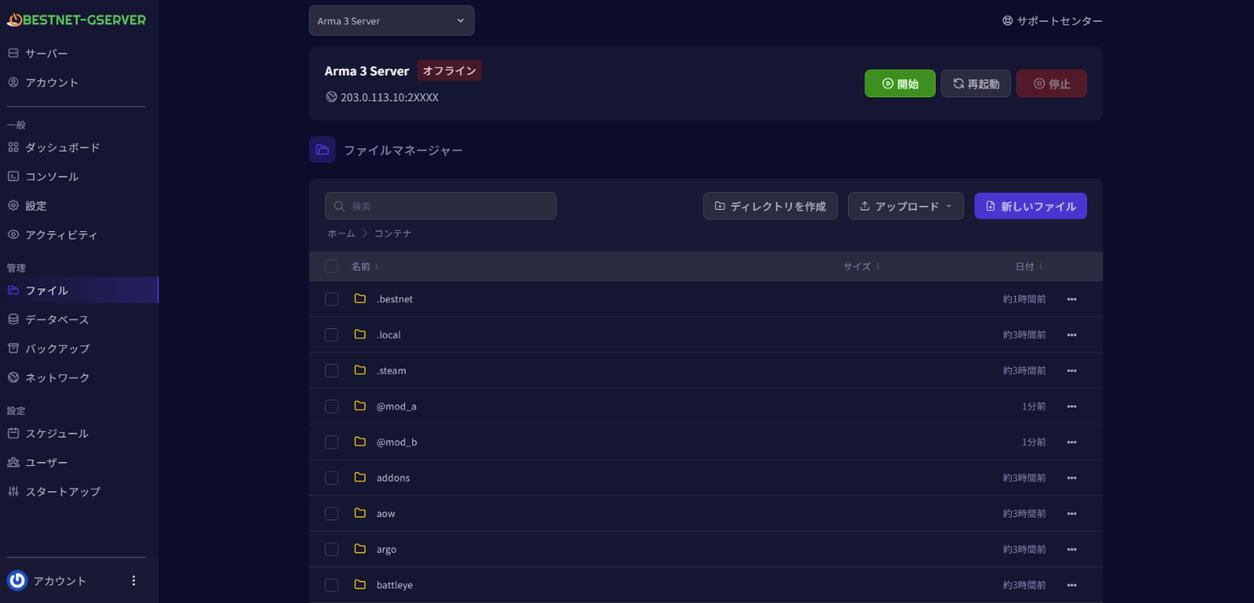
@mod_a and @mod_b are examples of uploaded modsserver.cfg, basic.cfg, missions, keys, profiles, BattlEye settings, or the mods and presets you uploaded. When a new version of an official file that you have edited is released, it is placed next to your file as <name>.bn-new.Using mods
You can load mods that you upload. Put the mod folders whose names begin with @ in the top-level folder using Files or SFTP, enter their names in [MOD] Mods to Load on the Startup tab, and restart. Mods are not downloaded automatically from the Steam Workshop, and we do not guarantee that any particular mod will work.
For the steps, see How to Add Mods to Your ARMA3 Server.
Stopping, reinstalling and backups
Stopping and saving
When you use Stop or Restart in the game panel, the game saves its progress before it stops (about 3 seconds). Once it has stopped, the console shows the following line (it means "stopped, game exit code 0").
[bestnet] 停止しました(ゲームの終了コード 0)If the game crashes (exits abnormally), the server is started again automatically.
Reinstalling
Reinstalling checks the game files and downloads again only those that are broken or missing. server.cfg, basic.cfg, missions, keys, profiles and uploaded mods are kept. You will find it under Settings.
Backups and restoring
You can create and restore backups under Backups in the game panel. Depending on your plan, up to 3 / 5 / 10 / 10 generations are kept. Backups do not include the game itself or uploaded mods; they save missions, settings, keys and profiles, which keeps them small and quick to create. After restoring, upload your mods again.
For the steps, see Restoring from a backup and Reinstallation Procedure When the Server Fails to Start.
Troubleshooting
You cannot join yet
Wait until Host identity created. appears in the console. The first start after a game update takes longer, because the update is installed first.
Check that the game versions match
If [UPDATE] Auto Update on the Startup tab is on, the server is brought up to the latest version every time it starts. When your own copy of the game is updated, restart the server.
A mod warning appears
If a mod you specified cannot be found, the console shows the following line (it means "mod not found, not uploaded yet") and the server keeps starting without that mod. Upload the whole folder to the top level, then restart.
[bestnet] MOD が見つかりません(まだアップロードされていません): @<name>The game files seem broken
Turn on [UPDATE] Validate Game Files on the Startup tab and restart. All game files are checked and repaired (this can take a few minutes). Turn it off again afterwards. Reinstalling also fixes this (your settings, missions and mods are kept).
If the problem continues
Wait a while and restart the server. If it still does not work, please contact support.


