
How to install a Forge modpack — the kind distributed on CurseForge and elsewhere — on your server and get it running. All of it is done from the game panel, and you never have to download the files yourself.
Three things to look up first
The modpack’s own page, or the variables.txt / README.txt that ships with it, will tell you these three things.
| What to find | What it is for |
|---|---|
| The Minecraft version | Guides which Forge version you need |
| The Forge version | You type this into FORGE VERSION under Startup |
| The memory it wants | To check your plan is large enough |
Match the Forge version and the Java runtime
- On the Console screen press Stop and wait for Offline.
- Open Startup from the left-hand menu.
- Under Docker Image, pick the Java version your modpack expects.
- Type the Forge version you found in step 01 into FORGE VERSION.
- Type the Minecraft version your modpack expects into MINECRAFT VERSION. Leaving it at the default can install a version you did not intend.
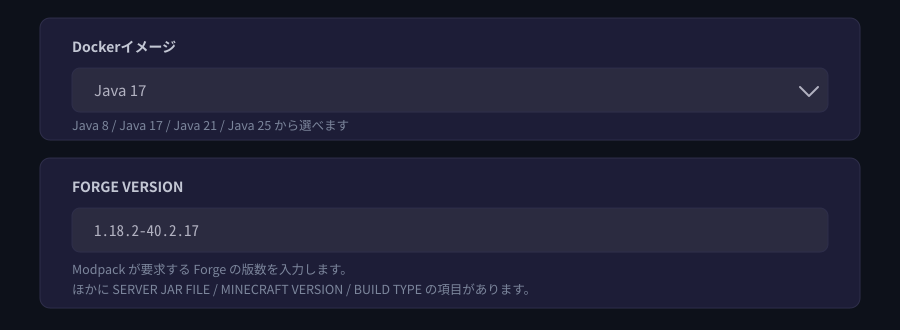
As a rough guide: 1.16.5 and earlier use Java 8, 1.17–1.20.4 use Java 17, 1.20.5 through the 1.21 line use Java 21, and 26.1 and later use Java 25. If the modpack states something different, follow the modpack.
Reinstall the server
Once the versions are set, rebuild the server with that configuration.
- Open Settings from the left-hand menu.
- Press Reinstall Server at the bottom.
- Confirm, and wait for it to finish.
When it finishes you will find a libraries folder under Files. On Minecraft 1.17 and later, run.sh and user_jvm_args.txt are created alongside it; on 1.16.5 and earlier you get a forge-(version).jar instead. If those are there, Forge installed correctly.
Pull in the Server Pack
On the modpack’s download page, find the Server Pack file — not the client one — and copy its download URL.
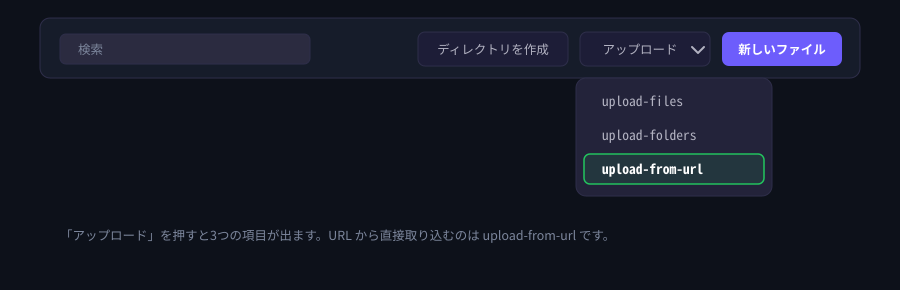
- Open Files from the left-hand menu.
- Press Upload and choose
upload-from-url. - Paste the URL and let it pull the file in.
Unarchive it, then delete the zip
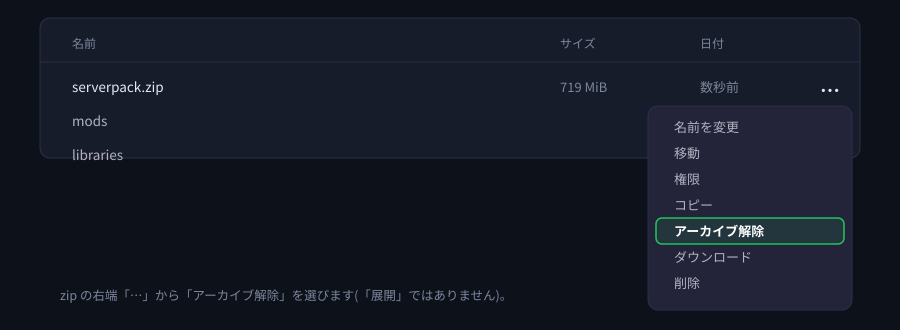
- From the menu at the right-hand end of the zip, choose Unarchive.
- When it finishes, use Delete in the same menu to remove the zip (confirm with Delete).
Start it and check
- Press Start on the Console screen.
- When the console prints
Done (…)!, the server is up.
If something does not go to plan
| Symptom | What to check |
|---|---|
| It stops right after starting | Check the Docker image (the Java version) matches the modpack. This is the most common cause by far. |
No libraries folder appears | Check the format of FORGE VERSION. Type it exactly as the modpack states it. |
| The file that came in looks small | Check the URL was for the Server Pack and not the client file. |
| Players cannot join, or see a different world | Check the modpack version on the client matches the server. |
| It says there is not enough memory | Check how much memory the modpack asks for. You can change plan while keeping your data. |
If that does not resolve it, send us the message from the console exactly as it appears and we will look into it.


