
Your Arma Reforger server is built automatically after you order. We take care of the fiddly preparation for you, port allocation included, so all you need to do is check the address and join. This page covers how to connect and how to change the settings you are most likely to want.
From ordering to a running server
- Once payment clears, the server starts building automatically.
- It is usually ready within a few minutes to a few tens of minutes, and we email you when it is done.
- Log in to the game panel from that email and press “Start”.
For the basics of the game panel, see Logging into the game panel and feature overview.
Find your address and join
The “Hostname” shown on the game panel “Dashboard” is your server address (IP address:port). Click the field to copy it.
There are two ways to join.
| Method | How |
|---|---|
| Through the server browser | In the in-game server list, search for the name you set in “[SERVER] サーバー名 (Server name)” on the “Startup” tab. |
| Connect directly | Use direct connect in-game and enter the hostname (IP address and port) from the dashboard. |
To require a password to join, fill in “[SERVER] サーバーパスワード (Server password)” (empty means no password; spaces are not allowed).
Crossplay between PC, Xbox and PlayStation is on by default. Turn “[SERVER] クロスプレイ (Crossplay)” off if you want a PC-only server.
Everything is set from the “Startup” tab
The main Arma Reforger settings can be changed from the “Startup” tab of the game panel — you do not have to edit a config file. Restart the server to apply your changes.
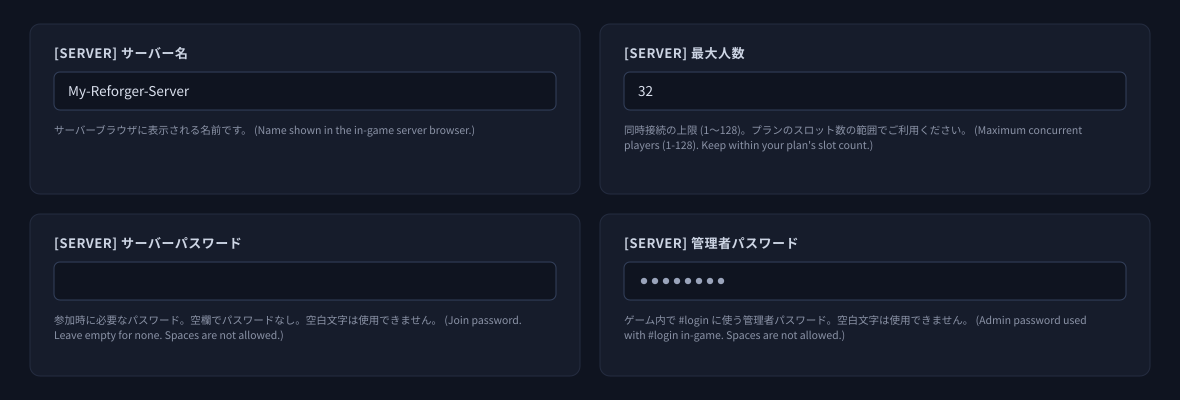
| Setting | What it does |
|---|---|
| [SERVER] サーバー名 (Server name) | The name shown in the server browser. |
| [SERVER] サーバーパスワード (Server password) | Password required to join. Empty means no password. |
| [SERVER] 管理者パスワード (Admin password) | The admin password used with #login in-game. |
| [SERVER] シナリオID (Scenario ID) | The scenario (map and mode) to run. The default is Conflict on Everon. |
| [SERVER] 最大人数 (Max players) | Player limit (1–128). Please stay within the slot count of your plan. |
| [SERVER] サーバーブラウザに表示 (Show in server browser) | On to appear in the public list, off for direct connect only. |
| [SERVER] クロスプレイ / 対応プラットフォーム (Crossplay / Supported platforms) | Whether Xbox and PlayStation players can join, and which platforms are allowed. |
| [SERVER] MOD 一覧 (Mod ID) | The mods to load (see the next section). |
The [ADV] entries also let you adjust third-person view, BattlEye (anti-cheat), view distances and the server FPS cap. BattlEye is enabled by default and we do not recommend turning it off.
Changing the scenario (map and mode)
Put the ID of the scenario you want into “[SERVER] シナリオID (Scenario ID)”. The default is Conflict on Everon.

The list of available scenario IDs is printed to the console when the server starts. Scroll back through the console and you will find lines pairing each ID with its scenario name.
These 31 scenarios ship with the server (as of 2026-08-15). Copy an ID and paste it in as-is.
| Scenario | Scenario ID |
|---|---|
| Conflict - Everon (default) | {ECC61978EDCC2B5A}Missions/23_Campaign.conf |
| Conflict - Northern Everon | {C700DB41F0C546E1}Missions/23_Campaign_NorthCentral.conf |
| Conflict - Southern Everon | {28802845ADA64D52}Missions/23_Campaign_SWCoast.conf |
| Conflict - Western Everon | {94992A3D7CE4FF8A}Missions/23_Campaign_Western.conf |
| Conflict - Montignac | {FDE33AFE2ED7875B}Missions/23_Campaign_Montignac.conf |
| Conflict - Arland | {C41618FD18E9D714}Missions/23_Campaign_Arland.conf |
| Conflict: HQ Commander - Everon | {0220741028718E7F}Missions/23_Campaign_HQC_Everon.conf |
| Conflict: HQ Commander - Arland | {68D1240A11492545}Missions/23_Campaign_HQC_Arland.conf |
| Conflict: HQ Commander - Kolguyev | {BB5345C22DD2B655}Missions/23_Campaign_HQC_Cain.conf |
| Combat Ops - Everon | {DFAC5FABD11F2390}Missions/26_CombatOpsEveron.conf |
| Combat Ops - Arland | {DAA03C6E6099D50F}Missions/24_CombatOps.conf |
| Combat Ops - Kolguyev | {CB347F2F10065C9C}Missions/CombatOpsCain.conf |
| Capture & Hold - Briars | {3F2E005F43DBD2F8}Missions/CAH_Briars_Coast.conf |
| Capture & Hold - Montfort Castle | {F1A1BEA67132113E}Missions/CAH_Castle.conf |
| Capture & Hold - Concrete Plant | {589945FB9FA7B97D}Missions/CAH_Concrete_Plant.conf |
| Capture & Hold - Almara Factory | {9405201CBD22A30C}Missions/CAH_Factory.conf |
| Capture & Hold - Simon’s Wood | {1CD06B409C6FAE56}Missions/CAH_Forest.conf |
| Capture & Hold - Le Moule | {7C491B1FCC0FF0E1}Missions/CAH_LeMoule.conf |
| Capture & Hold - Camp Blake | {6EA2E454519E5869}Missions/CAH_Military_Base.conf |
| Capture & Hold - Morton | {2B4183DF23E88249}Missions/CAH_Morton.conf |
| Game Master - Everon | {59AD59368755F41A}Missions/21_GM_Eden.conf |
| Game Master - Arland | {2BBBE828037C6F4B}Missions/22_GM_Arland.conf |
| Game Master - Kolguyev | {F45C6C15D31252E6}Missions/27_GM_Cain.conf |
| Omega 01: Over The Hills And Far Away | {10B8582BAD9F7040}Missions/Scenario01_Intro.conf |
| Omega 02: Radio Check | {1D76AF6DC4DF0577}Missions/Scenario02_Steal.conf |
| Omega 03: Light In The Dark | {D1647575BCEA5A05}Missions/Scenario03_Villa.conf |
| Omega 04: Red Silence | {6D224A109B973DD8}Missions/Scenario04_Sabotage.conf |
| Omega 05: Cliffhanger | {FA2AB0181129CB16}Missions/Scenario05_Hill.conf |
| Elimination | {C47A1A6245A13B26}Missions/SP01_ReginaV2.conf |
| Air Support | {0648CDB32D6B02B3}Missions/SP02_AirSupport.conf |
| Training | {002AF7323E0129AF}Missions/Tutorial.conf |
Copy the whole string including the { } and paste it in. Conflict, Capture & Hold, Combat Ops and the Omega series are all available.
Adding mods
Just enter the Workshop mod IDs as a comma-separated list in “[SERVER] MOD 一覧 (Mod ID)”. There is no need to upload anything by hand — they are downloaded and applied automatically at start-up.
If you leave it empty, the mod list in the config file is used as-is.
Checking that it started
After you press “Start” the status shows “Starting” and then changes to “Online” once it is ready. The first boot takes a little longer while the world loads.
These lines in the console mean the server is accepting players.
NETWORK : Starting RPL server, listening on address 0.0.0.0:<game port>
Server marked as running...
If you also see BattlEye Server: Initialized, the anti-cheat is active.
If something does not go to plan
| Symptom | What to check |
|---|---|
| The server is not in the list | Check that “[SERVER] サーバーブラウザに表示 (Show in server browser)” is on and that you are searching for the server name. If it is off, players can still join by connecting directly. |
| A friend cannot join | Check that their platform is included in “[SERVER] 対応プラットフォーム (Supported platforms)” and that crossplay is on. |
| I want more players | Change “[SERVER] 最大人数 (Max players)” and restart. Please avoid setting it above the slot count of your plan. |
| My change had no effect | Changes on the “Startup” tab take effect on restart. |
| The server will not start after adding a mod | Check the console. A missing mod and a mod that does not match the game version need different fixes. |
| I think a file is damaged | Put 1 in “[SYSTEM/Repair] File validation” and start — the files are verified (the boot takes longer). Clear the field afterwards. |
If that does not solve it, send us the message shown in the console exactly as it appears and we will take a look.


